
Getting Started with Spark on Kubernetes
How to run the first Spark job on a Kubernetes cluster
Apache Spark 2.3 brought initial native support for Kubernetes. With the recent release of Spark 2.4 the integration has been improved and client mode is now supported. Time to go through step-by-step and run some primitive Spark jobs.
ℹ️ Update on 2018-12-25: Simplified the way to address control plane API endpoint.
ℹ️ Update on 2019-01-20: Added hint to Spark Operator.
Presumptions
This is what’s needed to go ahead:
- A running Kubernetes cluster with role-based access control (RBAC) and DNS services enabled.
- Sufficient free cluster resources to run Spark (at least 3 nodes, 2 CPUs and 8 GB each)
- Access to the cluster via kubectl
- Authority as a cluster admin, or otherwise full access
- A public docker repository
- Knowledge about Kubernetes terms like pod, deployment, service.
- Basic understanding of what Apache Spark is.
- Have Docker installed on your workstation.
Out of Scope
Since this is a getting started guide, there are some things not covered in this post:
- Access to data. We stick with the SparkPi example for calculating Pi.
- Run a self-developed application.
- Show how to use Spark container images from private repos.
This is a little bit of a restriction, but let’s focus on the Spark-Kubernetes interaction, which is already a mouthful.
ℹ️ A completely different approach is using the Spark Kubernetes operator. It takes away some of the manual steps and supports Spark deployments as Kubernetes objects. This post is not making use of the operator.
Overview
In short, this is what we do:
- Create an artifact which contains the Spark application and can be deployed on Kubernetes (i.e. a Docker container)
- Put ourselves in a position to start the Spark job
- Submit Spark applications to be run on Kubernetes
- Run a Spark Shell on Kubernetes
The detailed process is a little more involved. Here’s an overview of what this guide covers:
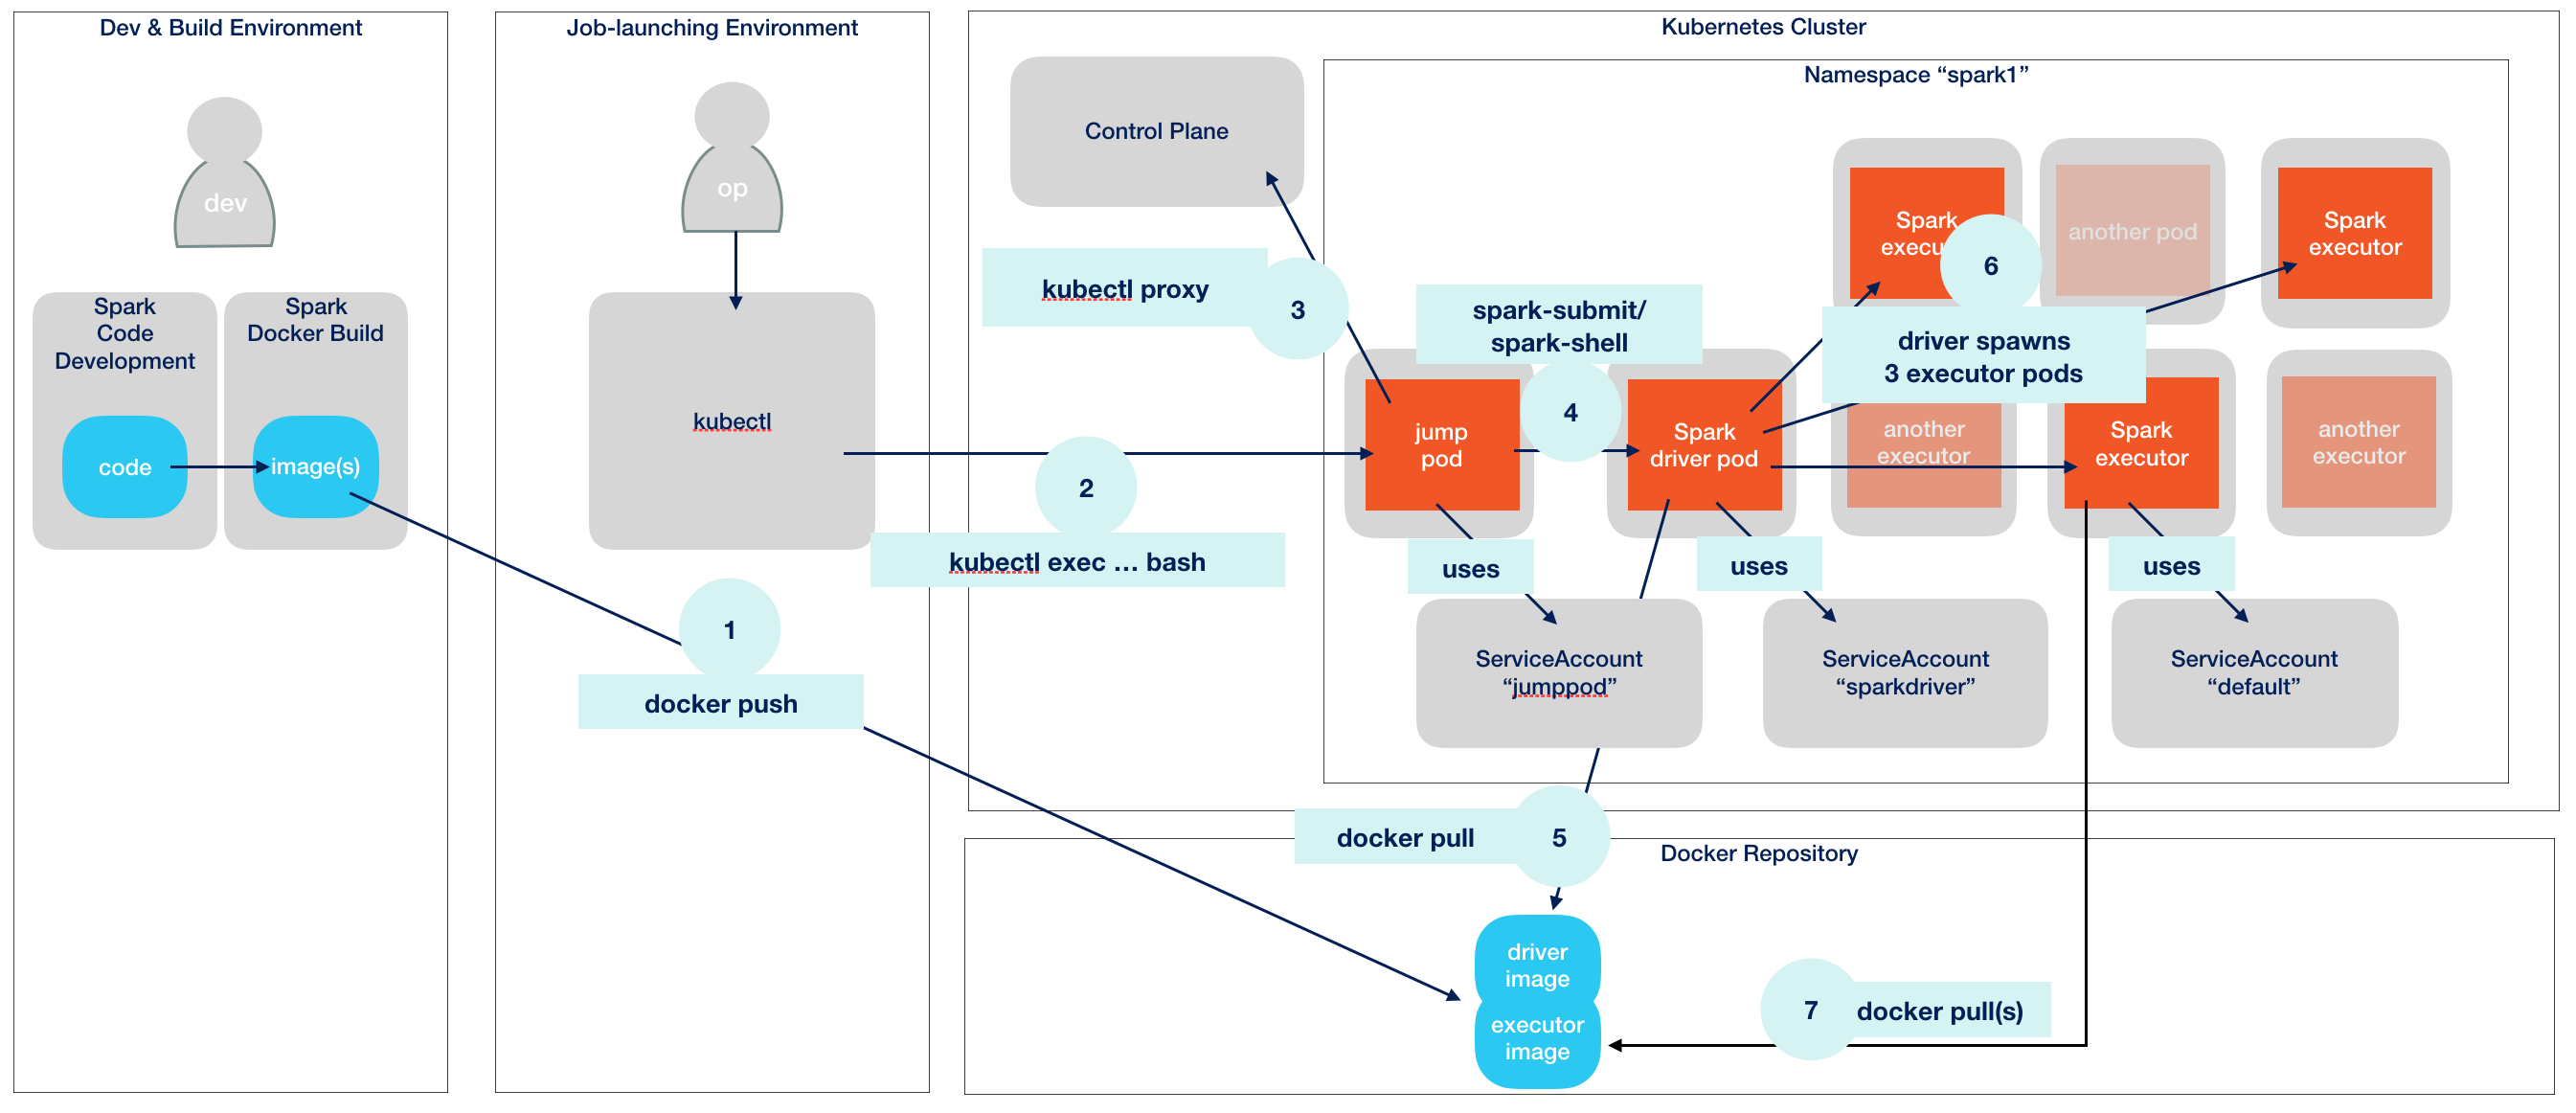
Overview
Apache Spark Jobs and Deployment Modes
If you are not familiar with Spark, then it is important to know that every Spark application consists of two building blocks: First and foremost the application’s master, called the driver, which boots and controls all processes. Second, the processes themselves, called executors, distributed all over the place (i.e. cluster). Executors do the heavy lifting number crunching while the driver watches them and makes sure the application as a whole runs successfully.
Except when in development, the executors will always run on some kind of cluster to leverage a distributed environment with plenty of compute resources. In our case this is Kubernetes.
The driver itself can run either outside or inside of the launch environment (“client mode” vs. “cluster mode”).
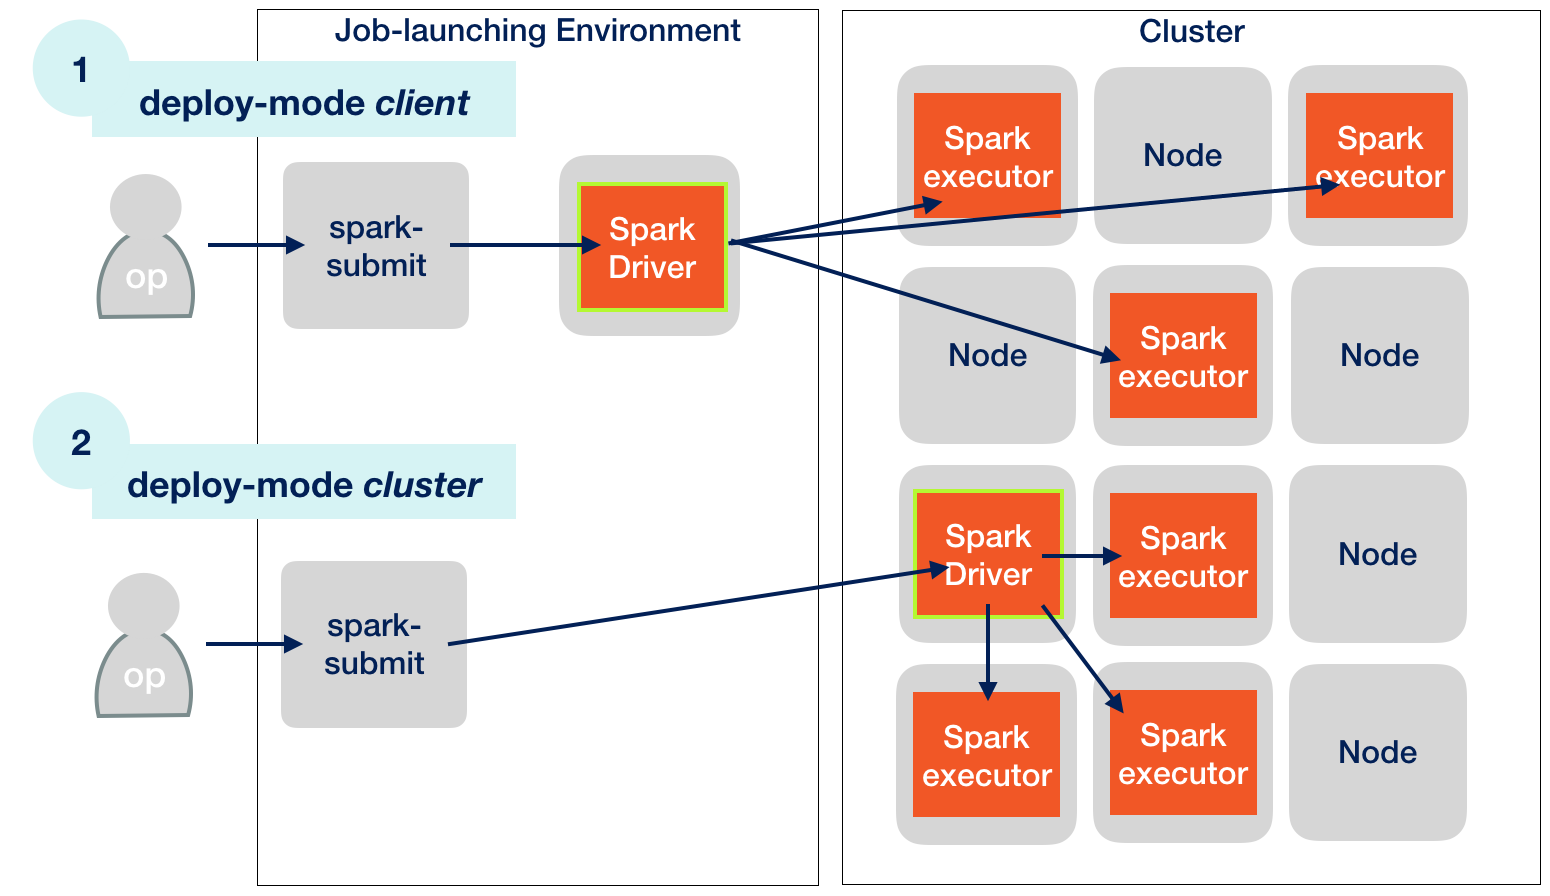
Kubernetes Deployment Modes
ℹ️ The launch environment can live outside of the Kubernetes environment. In this post, the launch environment itself is always inside the cluster, in a special pod.
The diagramme above shows that the driver initiates executor creation. It might look like if the driver creates the executors by itself. But this is not how it works. There is an indirection not shown here. In reality, the driver requests executor creation from Kubernetes. Workload scheduling is one of the central features of Kubernetes. Other popular schedulers are Hadoop’s YARN or Mesos.
Let’s take a closer look at that part of the puzzle:
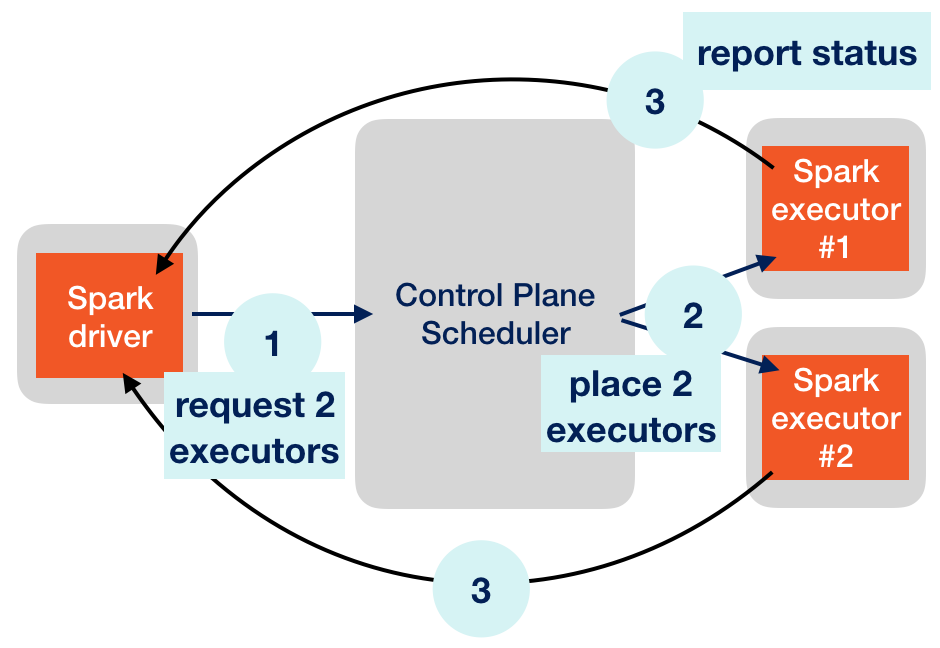
Driver/Executor relationship
Steps (1) and (2) show the scheduling. The next section covers step (3), “report status”.
Executor-Driver Communication
What Kubernetes won’t know is what the actual workload for the executors should look like. Executors a ready to handle a constant stream of tasks to chew on. Therfore, the driver needs to coordinate what task is to be executed next and which executor should take it.
Since there might be hundreds or thousands of executors running (with some of them even failing), the driver doesn’t really bother tracking them and asking for status. Instead, it’s the other way round. Executors are required to report back to the driver and ask for new work. This is a best practice in “master-slaves”-like distributed settings. The master (driver) should not be overwhelmed with herding slaves and should be able to focus on the actual work.
For the purpose of loading off their results, reporting status and requesting new work, the executors themselves try to create and maintain a network connection to the driver. If this is not possible, the job fails.
⚠️ To sum it up: Executor creation is done by Kubernetes, so the driver doesn’t need to contact anyone but the control plane, either from inside or outside the cluster. Executors, however, always need to be able to report back to the driver by establishing a direct network connection to that master process.
This can make things a little bit more complicated. Kubernetes pods are often not able to actively connect to the launch environment. In cluster deployment mode this is typically not a problem. This mode has the advantage that the application is completely running on the cluster, independently of the launch environment.
But in client mode, where the driver resides outside of the cluster, this might be an issue. Can’t we just skip client mode altogether? Sure, but not if we want to use Spark Shell. Spark Shell is an interactive mode with a Read-Eval-Print Loop (REPL). We can type Spark commands into a console and the driver will translate that into immediate work for the executors. As long as we don’t type anything, nothing happens. Spark Shell is a highly regarded feature and we will show how to do this in Kubernetes. It allows for direct interactive use of cluster resources.
Running Spark pods
On Kubernetes, the driver as well as the executors run as pods. Pods are container runtimes instantiated from container images. Typically, Docker is used for containerization. It’s another indirection we need to deal with: Telling Kubernetes which Docker image to use for our driver and then the driver needs to tell Kubernetes which Docker images to use for the executors. Kubernetes will fetch the images from a Docker image repository.
Getting Apache Spark
ℹ️ You can skip to section “Launching a Jump Pod” if you trust the Docker images I built ready-to-use. But, I don’t recommend to trust anyone.
Download and extract Spark 2.4.0 distribution package. You can do it this way (assuming a Linux or mac os shell):
wget http://archive.apache.org/dist/spark/spark-2.4.0/spark-2.4.0-bin-hadoop2.6.tgz
tar xvzf spark-2.4.0-bin-hadoop2.6.tgz
cd spark-2.4.0-bin-hadoop2.6
The relevant binaries like spark-submit are now accessible in ./bin/.
Creating the Spark Docker image
Kubernetes’ smallest piece of workload is called a pod. Every pod is created from a Docker image. This means, we need to create Spark Docker images before being able to run it on Kubernetes.
It’s very simple, because everything is already provided by the vanilla Apache Spark distribution.
Now, let’s build Spark’s standard Docker images.
⚠️ The code below uses the repository brainlounge/spark on Docker Hub. Most people (almost everyone but me) cannot push to this repo, so you might want to insert your own repository. This code must not only be writable (push) but also readable (pull) from your Kubernetes cluster.
export DOCKER_IMAGE=brainlounge/spark:2.4.0-hadoop-2.6
docker build -t $DOCKER_IMAGE -f kubernetes/dockerfiles/spark/Dockerfile .
docker push $DOCKER_IMAGE ← will only work with a repository under your control
Now we have something Kubernetes can deploy.
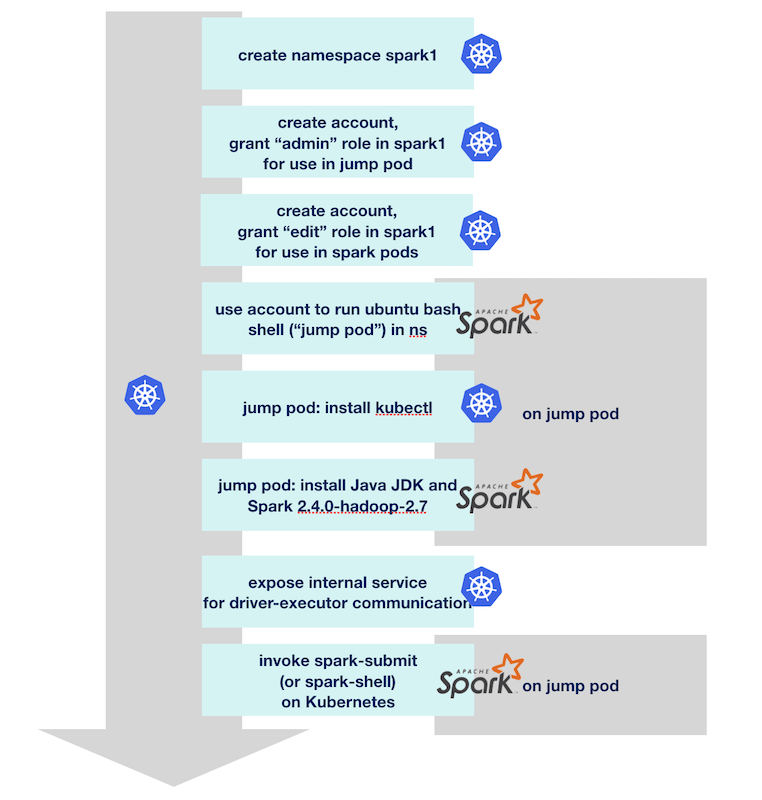
Launching a Jump Pod
⚠️ You should have a Kubernetes cluster accessible to go on from here. We require RBAC and DNS to be enabled.
What I call a jump pod is a special pod which helps us deploy cluster and client mode Spark applications. This is covered by a full separate post. Here, I’ll only repeat the necessary steps to get there. The example code uses a namespace spark1, and we’ll create the necessary namespace and account:
kubectl create namespace spark1
kubectl create serviceaccount jumppod -n spark1
kubectl create rolebinding jumppod-rb --clusterrole=admin --serviceaccount=spark1:jumppod -n spark1
kubectl run jump-1 -ti --rm=true -n spark1 --image=brainlounge/jumppod:ubuntu-18.04 --serviceaccount='jumppod'
The last command will drop us into a bash shell. The remainder of this post will use this shell.
Now that we have our jump pod running we need to configure it to launch Spark jobs.
Configuring Jump Pod as a Launch Environment
At first, we need to have kubectl ready in our jump pod, too:
apt update && apt install -y apt-transport-https apt-utils
curl -s https://packages.cloud.google.com/apt/doc/apt-key.gpg | apt-key add -
echo "deb https://apt.kubernetes.io/ kubernetes-xenial main" | tee -a /etc/apt/sources.list.d/kubernetes.list
apt update
apt install -y kubectl (Again, for details see this post.)
Now let’s install Apache Spark into the jump pod:
apt install -y openjdk-8-jdk
wget http://archive.apache.org/dist/spark/spark-2.4.0/spark-2.4.0-bin-hadoop2.6.tgz
tar xvzf spark-2.4.0-bin-hadoop2.6.tgz
cd spark-2.4.0-bin-hadoop2.6
ℹ️ This is an exact repetition of what we did earlier for creating the Docker image. You could argue that creating the image could’ve also been done from the jump pod. That’s exactly right, but is not what a typical distributed software development workflow would look like. Let’s assume the creation of the application artifacts and launching the application are two distinct workflows.
Let’s now create the service account for the driver. Again, we could reuse the jumppod service account, but it’s better to have the application use it’s own account spark-sa.
kubectl create serviceaccount spark-sa -n spark1
kubectl create rolebinding spark-sa-rb --clusterrole=edit --serviceaccount=spark1:spark-sa -n spark1
Running the Example Job (cluster mode)
Apache’s Spark distribution contains an example job. Typically, Spark jobs are heavy on input data, but this one works without any input, calculating a given number of fractions of Pi. It’s called SparkPi.
First, let’s do some preparation, storing our namespace, the service account and the pod’s authentication secrets into variables, this will simplify some commands later:
export NAMESPACE=spark1
export SA=spark-sa
export K8S_CACERT=/var/run/secrets/kubernetes.io/serviceaccount/ca.crt
export K8S_TOKEN=/var/run/secrets/kubernetes.io/serviceaccount/token
They will be picked up when we run the job.
Additionally, let’s also make use of the Docker image created earlier:
export DOCKER_IMAGE=brainlounge/spark:2.4.0-hadoop-2.6To support identification of the driver pod, we’ll use a fixed name which is shared in the job configuration and will be picked up by driver and executors:
export DRIVER_NAME=pi-driver-1The job will be submitted in cluster mode. It references the spark-examples JAR from the container image, which contains the entry point for the job, org.apache.spark.examples.SparkPi:
bin/spark-submit --name sparkpi-1  \
                 --master k8s://https://kubernetes.default.svc.cluster.local:443  \
                 --deploy-mode cluster  \
                 --class org.apache.spark.examples.SparkPi  \
                 --conf spark.kubernetes.driver.pod.name=$DRIVER_NAME  \
                 --conf spark.kubernetes.authenticate.submission.caCertFile=$K8S_CACERT  \
                 --conf spark.kubernetes.authenticate.submission.oauthTokenFile=$K8S_TOKEN  \
                 --conf spark.kubernetes.authenticate.driver.serviceAccountName=$SA  \
                 --conf spark.kubernetes.namespace=$NAMESPACE  \
                 --conf spark.executor.instances=3  \
                 --conf spark.kubernetes.container.image=$DOCKER_IMAGE  \
                 local:///opt/spark/examples/jars/spark-examples_2.11-2.4.0.jar 1000
ℹ️ The control plane API itself is exposed as a Kubernetes service in the default namespace on DNS entry kubernetes.default.svc.cluster.local, via HTTPS on port 443. This DNS can be cut short to kubernetes.default, but we’ll use the fully qualified name here.
⚠️ The ’local’ path /opt/spark/examples/jars/spark-examples_2.11-2.4.0.jar is actually referencing a jar in the Docker image, not on the jump pod. The path /opt/spark/... had been chosen when building the image (see the relevant code for the Dockerfile). Both, driver and executors, will rely on that path. Later in client mode this will require adjustments on the jump pod, too.
This job should run successfully, there should be a line containing phase: Succeeded.
You can also pull the driver’s logs:
kubectl logs $DRIVER_NAME
and the log should contain a line like this:
Pi is roughly 3.1...
Finally, let’s clean up and remove the driver.
kubectl delete pod $DRIVER_NAME
Congratulations, this was your the initial Apache Spark job on Kubernetes.
Running the Example Job (client mode)
Let’s switch from cluster mode to client mode.
We are still on jump pod jump-1 and the driver will now run on jump-1 itself. This requires a small reconfiguration:
export DRIVER_NAME=jump-1
And there’s need for a little more preparation. As I outlined before, executors need to be able to connect to the driver on the jump pod. We just need to decide which port, let’s choose at random port 29413. To completely address this port, we can either take the IP address. A better method is to create a Kubernetes service, a simple headless service in this case:
export DRIVER_PORT=29413
kubectl expose deployment $DRIVER_NAME --port=$DRIVER_PORT --type=ClusterIP --cluster-ip=None
This results in our endpoint becoming available using DNS, so we can look it up like this:
nslookup jump-1.spark1.svc.cluster.local
The DNS lookup returns a Name and a matching IP Address (your IPs will be different):
Server:         10.3.240.10
Address:        10.3.240.10#53

Name:   jump-1.spark1.svc.cluster.local
Address: 10.0.2.7
Hostname and port need to be added as configuration parameters when starting a client mode job:
... --conf spark.driver.host=$DRIVER_NAME.$NAMESPACE.svc.cluster.local --conf spark.driver.port=$DRIVER_PORT ...
The driver will expose a service for the executors on that port and executors will use host and port to connect. This is what we wanted to achieve.
Speaking of the driver, we now need to address our local jump pod Spark installation to identify the driver. The last line starting with local:// cannot change because the executors need to address the application code this way in the Docker image. But the jump pod has Apache Spark installed at the (fully qualified path) /spark-2.4.0-bin-hadoop2.6.
We fix this by making spark available via /opt/spark/ on the jump pod, too:
ln -s /spark-2.4.0-bin-hadoop2.6 /opt/spark
Spark installation paths on jump pod and Docker image are now in sync.
Now the Pi calculation should be working fine in client mode.
bin/spark-submit --name sparkpi-2  \
                --master k8s://https://kubernetes.default.svc.cluster.local:443  \
                --deploy-mode client  \
                --class org.apache.spark.examples.SparkPi  \
                --conf spark.kubernetes.authenticate.caCertFile=/var/run/secrets/kubernetes.io/serviceaccount/ca.crt  \
                --conf spark.kubernetes.authenticate.oauthTokenFile=/var/run/secrets/kubernetes.io/serviceaccount/token  \
                --conf spark.kubernetes.authenticate.driver.serviceAccountName=$SA  \
                --conf spark.kubernetes.namespace=$NAMESPACE  \
                --conf spark.executor.instances=3  \
                --conf spark.kubernetes.container.image=$DOCKER_IMAGE  \
                --conf spark.driver.host=$DRIVER_NAME.$NAMESPACE.svc.cluster.local  \
                --conf spark.driver.port=$DRIVER_PORT  \
                local:///opt/spark/examples/jars/spark-examples_2.11-2.4.0.jar 1000
Another change to the previous spark-submit is that for client mode we got rid of all submission parts in all spark.kubernetes.authenticate.submission properties.
This client mode job should complete successfully just as the previous cluster mode one.
Running the Spark Shell
Now let’s use the client mode to gain a Spark shell from here. The shell will be connected with executor pods and every calculation can be “pushed down” to be handled by the executors.
It’s very similar to the previous call, except there is no main class and no jar file reference needed.
bin/spark-shell --name sparksh-1  \
                --master k8s://https://kubernetes.default.svc.cluster.local:443  \
                --deploy-mode client  \
                --conf spark.kubernetes.authenticate.caCertFile=/var/run/secrets/kubernetes.io/serviceaccount/ca.crt  \
                --conf spark.kubernetes.authenticate.oauthTokenFile=/var/run/secrets/kubernetes.io/serviceaccount/token  \
                --conf spark.kubernetes.authenticate.driver.serviceAccountName=$SA  \
                --conf spark.kubernetes.namespace=$NAMESPACE  \
                --conf spark.driver.pod.name=$DRIVER_NAME  \
                --conf spark.executor.instances=3  \
                --conf spark.kubernetes.container.image=$DOCKER_IMAGE  \
                --conf spark.driver.host=$DRIVER_NAME.$NAMESPACE.svc.cluster.local  \
                --conf spark.driver.port=$DRIVER_PORT
Now we run a very simple distributed Spark calculation.
val range = spark.range(1000000)
range.collect()
Spark Shell execution
You can exit the shell by typing
:quit
Summary
With some significant Kubernetes-specific preparation, we have been able to easily run client and cluster Apache Spark jobs on Kubernetes. To keep this post self-contained, we omitted some important aspects like running own code, handling input and output data, dynamic allocation, having separate containers for driver and executor, and everything else that makes Spark really useful.