
How to Deploy a 'Jump Pod' on Kubernetes
Controlling a Kubernetes cluster from within
Having a jump host, bastian host (on AWS, on GCP) or sometimes called edge node is a common way to access computing resources which are not accessible otherwise. In this post I’ll explore how to create a Kubernetes pod acting as such a jump server within the cluster, which is then used to create more pods. I’ll need this later when running Spark on Kubernetes, but you can use it to be able to check the cluster’s internal network, too.
ℹ️ Update on 2019-01-20: Corrected one kubectl command.
There are many good reasons to make machines not directly accessible from the outside. Either because you want to keep your attack surface small. Or because they provide backend functionality and there is no need to expose them. It’s good practice to give computing instances only private IP addresses, which reduces accessibility from the outside. Every public IP address comes with a cost, because especially IPv4 addresses are getting more scarce now.
But sometimes, even with all the DevOps tooling out there, you still need to have a shell in an otherwise isolated and secluded realm.
Running a pod is simple, but the highly recommended practice of giving this pod some, but not too much, control over your cluster requires more work. Per default a pod is unable to create or even query other pods. In this post we want to explore a way to do so within security bounds.
Overview
Here’s an overview of what I want to achieve:
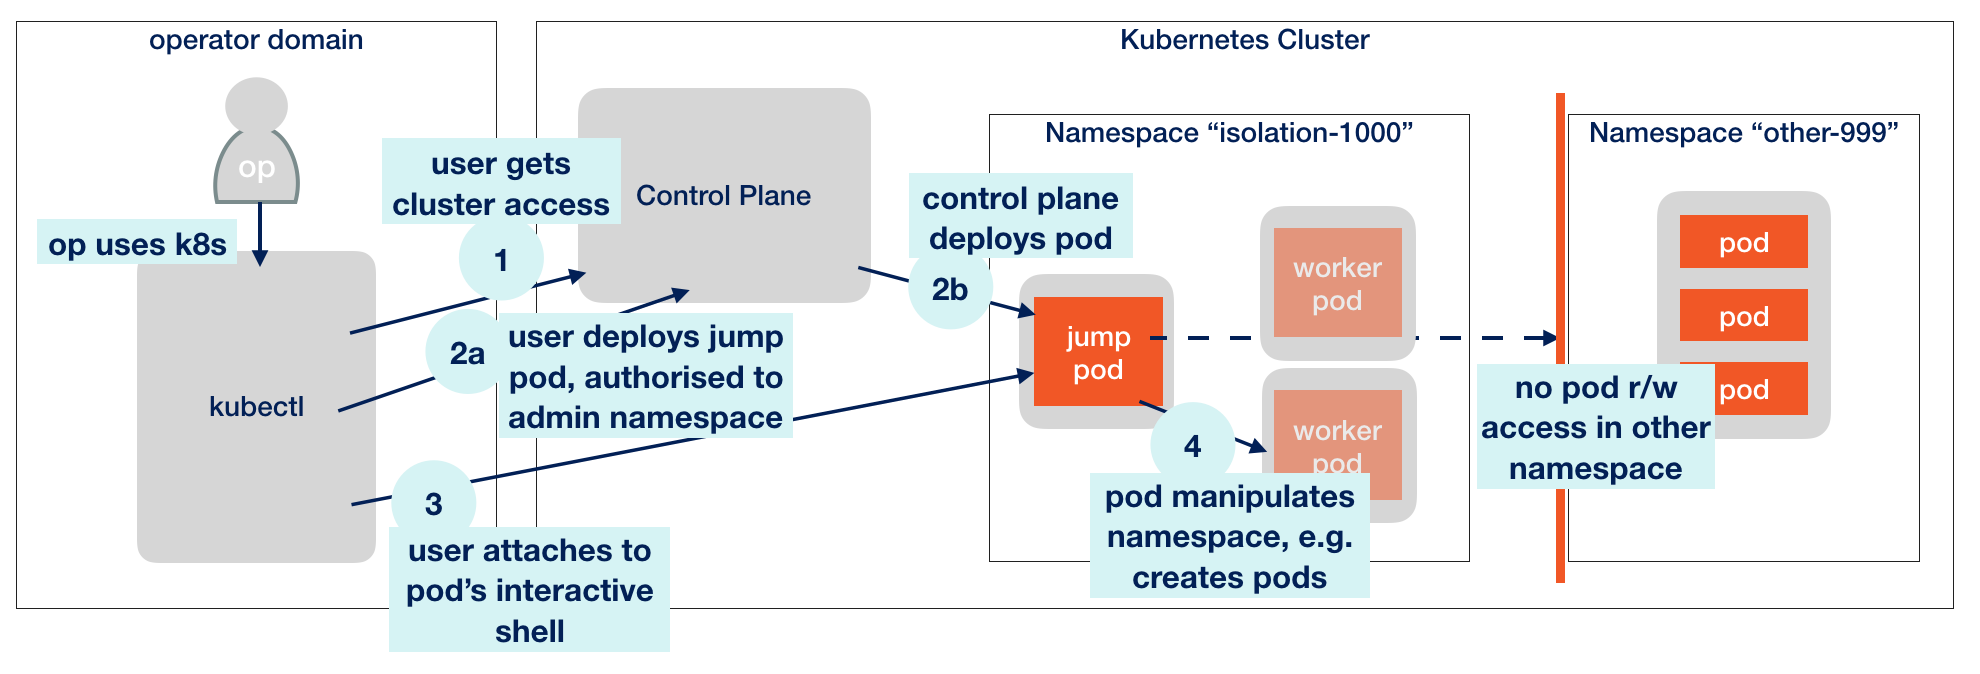
I want create a “jump pod” where I can get a shell, which is inside a Kubernetes cluster and which is authorized to create other pods in the same namespace, but only there.
The big difference to remotely accessing a cluster using kubectl for example from your workstation is that a pod resides in Kubernetes’ cluster-internal network. This allows for some checks from within. One nice usage is to query the cluster DNS service as we’ll see later.
Presumptions
This is what’s needed to go ahead:
- A running Kubernetes cluster with role-based access control (RBAC) enabled.
- Access to the cluster with kubectl
- Authority as a cluster admin, or otherwise full access
Creating a Service Role
For every namespace a default service account (named default) is created automatically, with very limited rights.
We do now create a new namespace isolation-1000.
kubectl create namespace isolation-1000 ← creates logical domain within the cluster
A new, separate dedicated service account will be helpful for the jump pod:
kubectl create serviceaccount jumppod -n isolation-1000 ← within this namespace, creates a new service account
ℹ️ Initially, this new service account (short: sa) has the same limited rights as the default account.
Getting a shell
There are more lightweight ways to get a shell in a pod than launching a full Ubuntu system. However, since I want to use the jump pod for more elaborate things later (see Getting Started with Spark on Kubernetes) , this is what we actually do, making use of the freshly created namespace and sa:
kubectl run jump-1 -ti --rm=true -n isolation-1000 --image=ubuntu:latest --serviceaccount='jumppod' bash
When this step has finally completed, we find ourselves on a prompt (bash shell) inside the pod, which looks something like this:
root@jump-1-797fd5f866-pdcf7:/#
Thing is, we cannot do a lot with this pod. We cannot even read/list the other pods from our namespace or from any other namespace in our cluster. Yet, we have a shell and can use the pod in isolation by installing software and use it:
:/# apt update && apt install -y dnsutils vim tmux wget curl gnupg watch
ℹ️ I’ll use the prefix :/# from now on to indicate the pod’s shell, and me@local > for my local kubectl-based control session. Please make sure you don’t mix them up like it happened to me.
Accessing the Kubernetes API (not)
Every Kubernetes cluster exposes an API server to retrieve information about the cluster and to apply changes.
Let’s now test if we really don’t achieve anything accessing the API server from within our pod. What we can always do is securely contact the API server. The required information is available automatically in every pod. We need:
- an access token for the service account used to identify the pod against the API server
- a central certificate so the pod can authenticate the API server (when it verifies the server’s certificate)
⚠️ If you’re not familiar with the security measures taken here to established authenticated and encrypted communication, I highly suggest you to study the topics of HTTPS, TLS and certificates. It’s one of the foundations of today’s Internet.
:/# SA_TOKEN=$(</var/run/secrets/kubernetes.io/serviceaccount/token) ← retrieve service account’s token
:/# CA_CERT_FILE=/var/run/secrets/kubernetes.io/serviceaccount/ca.crt ← certificate authority’s certificate
Now let’s try to call the API server and read the list of pods:
:/# curl -sS --cacert $CA_CERT_FILE -H "Authorization: Bearer $SA_TOKEN" https://kubernetes.default:443/api/v1/namespaces/isolation-1000/pods
This will be the expected, but disappointing response that listing pods is forbidden:
{
  "kind": "Status",
  "apiVersion": "v1",
  "metadata": {

  },
  "status": "Failure",
  "message": "pods is forbidden: User \"system:serviceaccount:isolation-1000:jumppod\" cannot list pods in the namespace \"isolation-1000\"",
  "reason": "Forbidden",
  "details": {
    "kind": "pods"
  },
  "code": 403
}
Giving full control within namespace bounds
Now we will give some control to the pod. We use the predefined cluster role admin to create a role binding. A role binding ties three things together: service account, namespace and admin role:
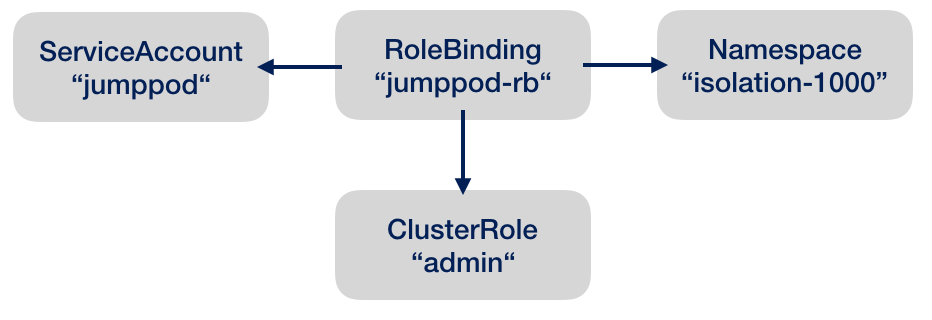
ℹ️ There are more predefined cluster roles and other subjects than service accounts (groups, users) to grant them, which I won’t cover here.
This is the command establishing the binding:
me@local > kubectl create rolebinding jumppod-rb --clusterrole=admin --serviceaccount=isolation-1000:jumppod -n isolation-1000
After that, we can immediately repeat our pod query command from above, now returning all the information for all the pods in the namespace.
:/# curl -sS --cacert $CA_CERT_FILE -H "Authorization: Bearer $SA_TOKEN" https://kubernetes.default:443/api/v1/namespaces/isolation-1000/pods
However, requesting the same info for another namespace will not work:
:/# curl -sS --cacert $CA_CERT_FILE -H "Authorization: Bearer $SA_TOKEN" https://kubernetes.default:443/api/v1/namespaces/other-999/pods
Starting a new Pod from within
Since we want to do serious stuff in the jump pod, we definitively need to install kubectl. Since we are root, we don’t need to sudo, and apt is short for apt-get. So here’s the simplified installation from the installation instructions:
apt update && apt install -y apt-transport-https apt-utils
curl -s https://packages.cloud.google.com/apt/doc/apt-key.gpg | apt-key add -
echo "deb https://apt.kubernetes.io/ kubernetes-xenial main" | tee -a /etc/apt/sources.list.d/kubernetes.list
apt update
apt install -y kubectl
Let’s fetch a deployment of a very simple mocking pod:
:/# wget https://raw.githubusercontent.com/berndfo/istio-mock/master/kubernetes/service1-deployment.yaml
And deploy it:
:/# kubectl create -f service1-deployment.yaml -n isolation-1000
Let’s wait until all new components are running:
:/# watch kubectl get pod,service -n isolation-1000 ← you can drop out of this view by typing ctrl-c
Besides the new pod, this deployment will also create a service, a named endpoint which can directly be called, giving access to the pod’s webserver:
:/# curl service1:8080/testcall
⚠️ You cannot get a shell in the service1 pod, because this container is stripped off of all things it doesn’t neccessarily need, including the shell, so we need to restrict ourselves to calling the service.
⚠️ The service is not yet available outside of the cluster, you need to expose the service or use kubectl port-forward.
Bonus track #1: Querying the Kubernetes DNS
A nice feature of Kubernetes is that each cluster has its own Domain Name Service (DNS). From the jump pod we can try to discover things using DNS lookups:
:/# nslookup service1
will return the fully qualified name of service1 within the Kubernetes cluster and the cluster-internal IP address:
Server:		10.35.240.10
Address:	10.35.240.10#53

Name:	service1.isolation-1000.svc.cluster.local
Address: 10.35.254.119
Additionally, you can look up services in other namespaces, for example the kubernetes service in the default namespace:
:/# nslookup kubernetes.default
Server:		10.35.240.10
Address:	10.35.240.10#53

Name:	kubernetes.default.svc.cluster.local
Address: 10.35.240.1
Bonus track #2: Preconfigured Jump Pod Docker Image
The installations we applied to the vanilla Ubuntu system need to be repeated every time you run a new jump pod. Another option is to build an image yourself, or to use the my pre-built public image like this:
kubectl run jump-1 -ti --rm=true -n isolation-1000 --image=brainlounge/jumppod:ubuntu-18.04 --serviceaccount='jumppod'
Summary
We created a jump pod in our own namespace and authorized it to look around there. From this pod, objects in the cluster can be accessed and controlled. We showed this by booting a pod and calling a service.